
Ibanez RG470 Rebuild and Modification
This post is a compiled version of the original 5 part Ibanez RG470 project portfolio found on GideonD’s personal blog. It has been slightly edited and improved, but remains broken into phases just like the original was.
Ibanez RG470 Rebuild and Modification – Phase 1
Some Background
Orion ordered this Ibanez RG470 guitar back in 2000 or 2001. He’s never really been satisfied with it. Ibanez makes some extremely good guitars, but like most brands, they also make some real junk. This is a MIK (Made it Korea) model and sub par at best. The body and neck are pretty decent. A fret job and some polish will work wonders there. The stock pickups are junk in this axe, and he’s hated the tremolo since day 1.
The goal of this project is some major modifications to the axe to bring it up to a good solid playable guitar.
Initial Photos of the Ibanez RG470


You can see in these photos that the guitar isn’t in bad shape. The standard dirt and corrosion from being played for several years is all that is apparent. There is no damage to the body or neck.
Take a look at the closeup view. You can see the stock pickups. The neck has an Infinity 1 ceramic humbucker. The bridge has an Infinity 2 Alnico 5 humbucker. The middle is an Infinity Single 1 Alnico 5 Single Coil. They have always sounded pretty flat and lifeless. It’s time for a change there. We’ve decided to go Dimarzio for this project. The bridge will be a Tone Zone with black metal cap. The neck will be an Air Norton with black metal cap. The middle will be an Area 67. We haven’t yet decided whether or not to coil tap the humbuckers. I want to, but at the same time I doubt he’ll ever use them as singles.
Take another look at the closeup. This time pay attention to the tremolo unit. This guitar has a Lo-TRS II trem, which is total junk. The thing pops strings constantly. This is one of the worse tremolo units Ibanez ever made. Thankfully it’s easy to switch it out for something better. We chose a Gotoh GE1996T double locking tremolo. This is a Floyd Rose style tremolo. It’s a high quality Japanese model which rivals the Original Floyd Rose models in quality and hits a better price point.

We’ll also be adding a tremsetter and heavier springs in the rear tremolo compartment. Right now it has the original springs in a V configuration. It came with 3 but one was removed for reasons which I can’t even guess at. We’ll be replacing them with fresh new heavier tension springs and leaving it at just two springs so the tremsetter will fit in between. The heavier springs should make it balance out better with the string tension. Right now he is running super light 9-42 strings and we still have the screws on the spring claw cranked down pretty tight.

The tremsetter we’ll be installing is called the Black Box.

This goes in place between the tremolo springs. The padded tip will rest against the tremolo block and provide reverse spring tension to push the block back into it’s original position after heavy dive bombing on the tremolo arm. The whole point to using a tremsetter is to return the tremolo unit back to the original position and thus the original tuning. Floating tremolos are famous for throwing the guitar out of tune every time you hit the bar. The Black Box is a very good tremsetter at a good price. There are a couple of better ones. ESP makes their own version and Ibanez use to though you don’t see it very often anymore. Both of those were a doubled up version of this one, featuring two spring units to provide even more stopping power. The Black Box works great though. I use to use Hipshot tremsetters back when there was no alternative but they never really worked that well.
Ibanez RG470 Rebuild and Modification – Phase 2
Tear Down
First of all lets take a look at the guitar now that I’ve popped the strings off and removed the old tremolo system.


We are down to an empty cavity at this point. I’ll need to pull the existing studs and anchors so I can replace them with the new Gotoh studs and anchors, which are better on many levels.
Let’s compare.
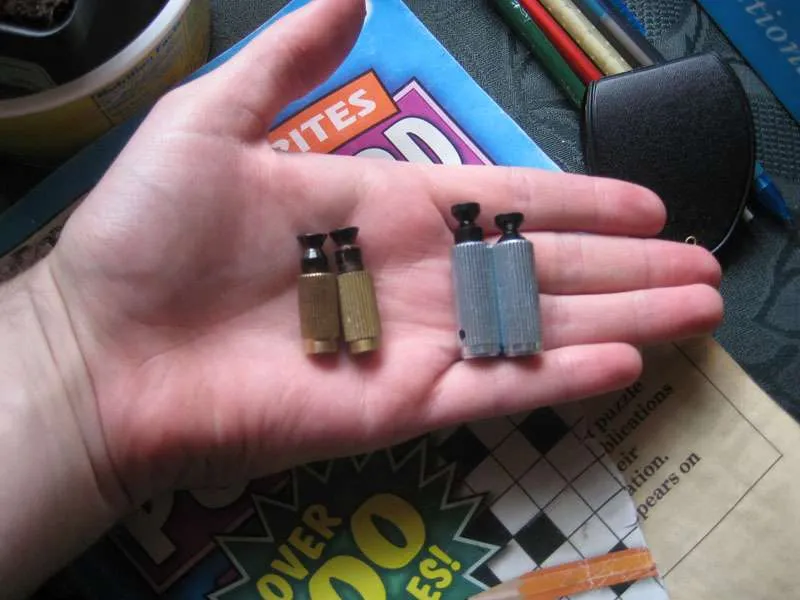
The brass ones on the left are the originals. The new Gotoh studs are on the right. They are much bigger both in depth and diameter
The old studs were mounted in a 3/8″ diameter hole. I’ll need to tap that hole deeper and bigger around to fit the new studs. My guess at a 7/16″ bit turns out to be correct this time. Thanks Gotoh for giving me instructions on how to attach the tremolo arm. It would have been nice to have instructions for installing the tremolo as well.
Before I begin tearing out the studs I’m going to mask off the face of the guitar to avoid damaging what’s left of the paint.

I’m just using blue painter’s tape. It won’t hurt the guitar at all. Unfortunately it barely wants to stick to it at all either. That’s alright though because it won’t be on there for long. You’ll notice that I made sure to cover the pickups with tape as well. This prevents the magnets from picking up any stray metal shavings. This is a good idea for any project that involves filing or fitting new parts.
To remove the old studs I’m going to leave the posts screwed into the anchors so I can hook them with a regular old claw hammer. I’ll lay a paint paddle or other thin piece of wood on the body of the guitar to prevent the hammer from denting the wood as I pry the studs out. When doing this, it’s important to pry in the correct direction. Once you hook the stud, face the head of the hammer toward the top or bottom edge of the guitar to pry. Facing it toward the front or back would risk damage to the pickups as well as place too much force on the thinnest piece of wood around the stud, which is the part facing into the cavity.
If you aren’t careful, this can happen.

Notice the chunk of wood missing on the right? I can honestly say I didn’t do that! This is what I found after removing the black padding around the post while drilling it out. You can’t see it here, but the lower part on the side is cracked and painted over. It evidently came from the factory this way. Thanks Ibanez!
At least the Gotoh anchors go far enough into the body that the crack isn’t going to cause any problems. I intend to inject some rapid set epoxy around it later just to be safe.
The photo above shows the new Gotoh studs already installed. I just hammered them in with a rubber mallet and a small block of wood. I also added a thin coat of laminate flooring glue to the outside of the anchor before inserting it. This step isn’t absolutely necessary but I like the added security of the bond. Laminate glue will give a tough flexible bond that isn’t so strong that you can’t pull the studs out later.
Installing the Gotoh GE1996T
Now I’ll remove the tape from the face of the guitar and drop the new tremolo into place, making sure to hook the knife edges under the new studs. This is pretty straight forward.
Then in the back of the guitar I’ll stretch new springs from the claw to the tremolo block.

To do this I first used a pair of needle nose pliers to stretch the spring from the center claw to the center hole. This keeps the block balanced. I then installed the outside two springs the same way and removed the center one. I’m using heavy springs in this setup since I’ll only be using the two springs. The center will remain open for the Black Box tremsetter.
Once the springs were in place the brass block, which is very nice compared to the old cast metal block, was pulled tight against the front of the cavity. I flipped it over and pried the whole tremolo up against the posts so I could slip paint paddles in under it until I got it parallel to the body.
Now it’s time to string the guitar. This process is a real pain. When tuning one string on a floating tremolo, all the other ones change pitch as well. I won’t get into detail on it but www.ibanezrules.com has a great set of guides in the Tech section on how to do this properly.
Once the strings are up to tension it’s fairly easy to remove the shims I was using to hold the tremolo parallel to the body. Then it’s all a matter of balancing the string and spring tensions to get the thing up to tune and in the correct position relative to the body.


I had to use #10 strings on this one due to the tension the heavier springs cause. I usually use #9 but the owner is fine with the #10.
Some Problems with the Ibanez RG470
I did run into a couple of issues. Only one of them is directly related to the tremolo.
The main problem I have is that the brass block on this tremolo is slightly deeper than the old one. I thought it would fit inside the cavity, and it does, but barely. The fit is so tight that the block will rub on the plastic plate that covers the spring cavity when the tremolo unit is actually used. To fix this I can either cut the brass block down or cut a hole into the spring cover to allow the block to swing freely. If the block were any longer I would have to remove it and cut it down. Thankfully it’s so close that cutting out some of the plastic cover will work fine. I don’t have any problem with the way that will look. My Stratocaster has always had a window in the cover to feed the strings through the block on its tremolo. This way we can always admire the brass block whenever we desire as well.
The other problem I’ve run into is how dead the G and B strings sound. I thought I had a problem with the tremolo at first but soon discovered that the strings sound fine when actually fretted. So the problem lies at the nut. The owner confirmed that the guitar has always had this issue. I’ll need to shim the nut up off the neck a little. Gotoh was nice enough to supply me with brass shims for their included nut, which I did not use. The Gotoh nut was not quite wide enough to fit the Ibanez neck. The pads and screws worked fine on the old nut though.
Regardless, it’s too late to worry about shimming the nut right now. I’ll get to that a little later. In a couple of months the new pickups will be here and I’ll be removing the strings again anyway. I’ll wait until then to shim the nut and have a fret leveling done on it as well.
Ibanez RG470 Rebuild and Modification – Phase 3
Black Box Install
Nothing much to report here. And no photos this time. This went so quickly I didn’t even think to take any.
I installed the Black Box, which is a pain but goes fast. The way they place the screw mounts is beyond reason. You almost have to remove the whole tremolo to mount the thing. I managed to get the screw under the spring in while the unit was assembled by using a very thin screw driver.
Update!
I’m adding the Black Box installation section from the RX170 project here for reference since I forgot to take photos of the install process on the RG470.
Installing the Black Box
In this section I’ll walk you through how to install a Black Box tremsetter. I know I neglected this last time so I made sure to get a full set of photos this time. The camera isn’t working the best though and some of the photos are a little blurry. I think they are still good enough to see what I’m trying to show you.
First of all you need to make sure your tremolo is properly setup and the guitar is tuned as close to perfect as you can get it. I installed the Black Box after I had already fiddled with my spring tension and tuning until I got the new tremolo perfectly balanced on the guitar. I had also already spend a couple of hours tweaking intonation.
Once all of that is done you want to lay the Black Box in the middle of the tremolo cavity and make sure it is pressed firmly against the tremolo block, but not firmly enough to make the block move.
Then you need to mark the position of the tremsetter because you’ll have to remove the tremolo from the guitar to get this thing installed correctly. I used a black paint marker I had from model building. It marks fine on the aluminum tape. You could also use a very fine marker.
Now you’ll need to remove the tremolo from the guitar. You have to disassemble the Black Box in order to screw it into place and put it back together while it’s mounted. The tremolo block gets in the way of this.
Thankfully it’s easy to remove the tremolo without taking all the strings off the guitar. To do this, detune the guitar about four or five turns per string. Do this gradually, one turn per string so you don’t put too much tension on any one string. Once they are detuned the tremolo should be lying against the face of the guitar. Flip it over and use needle nosed pliers to pop the springs out of the block. Flip it over again and you can put back and up on the tremolo unit to pop it off of the posts.
Now we can flip it back over and start installing the Black box.
First you want to unscrew the knurled knob at the outside end of the unit until you completely remove it from the threaded stem. Be careful not to loose the rubber o-ring that fits around it. Next unscrew the other knurled knob inside the unit. You’ll have to thread the entire stem out of this one. When it reaches the end the stem will pull out and the spring, knob, and washer will come out separately. Pay attention to how these come apart so you can put them back together correctly.
Now that you have the guts separated from the shell of the Black Box with can screw the shell into place. To do this you want to line it up with the marks you made earlier. There should be one screw hole at the tip pointed toward the spring claw and another one offset inside the shell. Use a nail to punch a starting hole at these marks. Now use one of the supplied screws in the offset hole inside of the shell to anchor it. Make sure not to over tighten it and lift the other end off of the surface. This guitar’s trem cavity was not perfectly flat and tightening one screw too much meant the other would not make contact. Make sure the shell will sit flat when the screws are both tightened.
Once that screw is in you can tilt the shell to one side so you can slide the guts back in. Slide the stem back in from the trem block side and start threading the knurled knob back on it. You want to place the metal washer and spring back in place before you thread too much stem through for them to fit.
Once the stem reaches the hole on the other end of the shell so it can’t pop back out, flip the shell around straight and anchor it with the other provided screw.
Now you can finish threading the stem in the rest of the way. Once that is done replace the rubber o-ring and the other knurled knob at the end.
Replace the tremolo unit the exact opposite of how you removed it and get the guitar back up to proper tuning. After that, you can use the knurled knob on the end of the Black Box to adjust the position of the stem against the tremolo block. You can also use the knurled knob in the middle of the unit to adjust how much tension is on the center spring. This will determine how stiff the resistance is against the tremolo block when it hits the tip of the stem.
That completes the Black Box installation.


Shimming the Nut on the Ibanez RG470
I also attempted to address the deadened strings by shimming the nut. I placed a heavy brass shim under the nut. I’m not sure of the exact thickness. These came with the Gotoh Tremolo and they are not labeled in any way. It’s the thickest one in the set. This helped a little on the G string, but the B string still sounds just as bad. There is plenty of clearance now from the frets to the strings and the sound only deadens when playing open strings. I am at a loss for any explanation other than the nut itself being at fault. I’ll let the tech at the guitar shop file it a bit to see if he can fix it or at least confirm my suspicions before I invest another $50 for a new Japanese Ibanez nut.
I also think this guitar may need a complete fret replacement, the more I look at it. The frets have some definite string wear and are filed too flat and low as it is. The owner took his guitar to Jammerz Music about a decade ago to have the guitar completely refretted. They charged him $175 and it looks to me like they never replaced a single fret wire. I think they just attempted to level the frets and did a terrible job. They filed them way too flat and never attempted to crown or polish them correctly. I found the original receipt and was slightly amused at the line toward the bottom that read, “No returns after 24 hours.” Now that’s service! Anyone from Staunton beware of this company. They are still in business and still have crap service. Thankfully they are almost never open for business.
I’ll post another update once I get this to the shop to have the frets and nut taken care of. Hopefully they can fix it up without having to spend a massive amount of money. Including the pickups that haven’t arrived yet we have about $500 in this project. Add the original price of the guitar, which was about $600 I think, and we are up to $1100 invested. He could have just bought a good Japanese Ibanez to begin with if we’d have foreseen all these issues.
Ibanez RG470 Rebuild and Modification – Phase 4
Sorting out the nut –
Well I finally got the new nut for the RG 470. The nut itself fit right into place being a Japanese Ibanez replacement part. I didn’t use the new string tree since the spacing was off on it compared to the old one. No need to drill new holes just for a string tree. It seemed to remedy the problem with the B string resonating oddly.
Earlier this week I took the guitar to Fretwell Bass in downtown Staunton and had Chip take a look at the fret wire. He was able to level and crown the existing jumbo fret wire without having to do a complete refret. That saved me about $75. The guitar plays like new now. I do notice that the G string now sounds a little odd though, very similar to what the B was doing before. I checked the nut and there is no sign of any damage. I’m chocking it up to the age of the strings on it (which were unused but setting in the case for about a decade.) I’ll wait until we change out the pickups in October and put some DR Tite-fits on it. If the problem doesn’t go away I’ll be at a loss.
Summing up –
Well for now it’s playing very good so I’m happy with it. Orion is happy with it too. He still isn’t digging the stock pickups, but come October we’ll sort that one out and have a real nice axe put together. I still think he’d have been better off finding a used RG550 instead of dumping all this money is the sub-par RG470. But to each his own.
Ibanez RG470 Rebuild and Modification – Phase 5 Final
Update
I’ve been having some health issues so I haven’t been able to work on these guitars for a while but I’m finally back in action. The green RX170 went on hold for a bit since I’m having some issues working out the wiring on the Lace Sensors. It’s crazy how many wires they have and how little documentation. In the mean time, the pickups arrived for the RG470 so we spent about a week (my vacation basically) wiring and rewiring until I got it all sorted out. Here is where we stand so far.
Original Wiring Diagram for the Ibanez RG470

This is the original wiring we came up with for the guitar. Using a combination of the 5 way selector and a push/pull volume pot we would have been able to have both humbuckers splittable to single coils and then have the switch auto tap the humbuckers in the 2 and 4 positions in order to be running the middle single and one coil of the humbucker to basically form another humbucker from two separate pickups. So basically it would be:
Positions 1: Neck Coils 1&2
Position 2: Neck Coil 2 & Middle
Position 3: Middle
Position 4: Middle and Bridge Coil 1
Position 5: Bridge Coils 1&2
It was great in theory, but resulted in no signal at all. I thought at first it was the kill switch we installed causing problems. The kill switch simply routes all signal to ground to basically turn off the guitar. You can also use a momentary push switch for this to get an odd sort of wah effect by phasing the signal in and out.
We removed the kill switch and still had no signal. At this point I ripped it all apart and wired the switch normally without the auto tap. It worked fine at that point. I discovered that the switch I had was not the standard layout of the most common CRL brand switch but instead a tweaked layout more like a Fender Strat uses. The owner liked the sound of it better without the auto tap anyway so instead of sorting out the lugs on the switch we just left it wired normally and redesigned the rest of the layout.
Final Wiring Diagram for the Ibanez RG470

This is what we ended up with for the final wiring. I managed to break the push/pull pot when removing the knob from it. These things are very fragile and the brass push on knob fit so tight on it that despite using a pair of pliers to hold the shaft while I pried the knob off, I still managed to pull the shaft completely out of the pot. It was really no big loss. I didn’t like how loose the push/pull pot felt anyway. I put the original volume pot back in and rewired the mini toggle into a coil tap instead of a kill switch.
I’ll point out a few other changes as well for reference.
First, you’ll notice a part on the volume pot that is not normally there. This is a capacitor and resistor combination that allows the volume pot to operate at a smoother reduction than it normally does while preserving the higher treble frequencies that are normally lost when the volume is rolled back.
Second, you should note that I switched the red and green wires on the middle pickup. The way I originally had it wired put the middle pickup out of phase when used with one of the humbuckers. This resulted in a very twangy sound that I didn’t like. By switching the wires we are running the signal from the middle pickup in reverse order which puts in back in phase with the humbuckers. You won’t even notice this when playing each individual pickup, but when playing in position 2 or 4 using the middle pickup in conjunction with one of the humbuckers it becomes very apparent.Third, you’ll notice the addition of another capacitor in line between the hot lead on the bridge pickup and the lug on the selector switch. I had heard some stories about the Tone Zone pickup sounding muddy in some guitars due to the way it interacts with the wood the guitar is made of. This guitar is basswood, which has a dark tone to begin with. The Tone Zone picked that up and combined it with it’s own booming low end. The result was too much bass saturation for the bridge pickup. By placing another 0.47uF capacitor in line on the hot lead we effectively filter out some of the bass frequencies from the pickup. It still has that signature Tone Zone sound but it’s a bit brighter and has more clarity. More detailed instructions on this can be found at Lone Phantom’s Blog. There is another mod that can be performed by dismantling the pickup and modifying the magnet placement to further tweak the sound of the Tone Zone. This is called a half-air mod and is covered in detail at Lone Phantom’s Blog. This was more invasive than I wanted to get on the pickup and I think it would change the sound too much for my taste.Fourth, I added a ground wire from the metal ring we installed around the middle single coil. It was buzzing badly when you touched it without touching the strings. I never thought that it was cause that kind of interference since it was not connected to any metal pieces of the pickup itself, but I was quite mistaken. A simple ground wire tied under the ring and soldered to the volume pot cleared it right up though.
Project Completion
That finishes the project other than polishing the guitar up and getting some sound samples together. I’ll post up samples in a related post a little later. For now, I’ll close with some photos of the finished guitar.


Products Used for the Ibanez RG470
Note: These are mostly affiliate links.
Gotoh GE1996T Black: https://amzn.to/3zsK6WE
Black Box Tremsetter: https://www.fu-tone.com/product/tremolo-black-box/
DiMarzio Tone Zone: https://amzn.to/3DrrF5E
DiMarzio Area 67: https://amzn.to/3U6SouU
DiMarzio Air Norton: https://amzn.to/3sLO34U

