Ibanez RG530 Roadstar II Rebuild Project
This is a compiled project portfolio originally found on GideonD’s private blog. In this project we took an old Ibanez RG530 Roadstar II and upgraded the guts of it while leaving the aged ascetics alone. Enjoy!
Introduction
I stumbled across this bad boy on Ebay late one night when I shouldn’t have been up spending money. I couldn’t pass it up though so I put in a maximum bid I was willing to offer and went to bed. The next morning I discovered both to my delight and chagrin that I won the auction.
When I finally received the guitar, It was in better shape than expected.
The paint chips were very minor. I decided I was just going to leave them alone.
The frets needed a little filing but were pretty level. I took some micromesh to them and cleaned the fretboard good before putting a coat of lemon oil on it. It looked much better.
Before I ever got started I doused the electronics with De-oxit. When I tested it I had absolutely no crackle from the original controls. It looked like the electronics could stay original.
The Edge was in very good condition. There was some wear on the paint on the saddles, but rust was limited to the screw heads only and was very minor. My biggest fear was the knife edge. I popped the trem out and took a look and to my surprise the knife edge was nearly flawless. It looked like the trem was never even used.
I did plan some upgrades though. I decided to leave the paint on the neck so it would stay original, at least until I found out if I could stand playing on a painted neck. The nut was missing the locking screws and pads, but that wasn’t a big deal. I needed to fill the strap button holes and redrill them for strap locks. The pickups had to go. I’ve never been fond of IBZ pickups and these were no exception. They were the muddiest I’ve ever heard. I decided to drop a L500XL/L500R combo in there from Bill and Becky. I’d already put noiseless springs in it (remember to file the ends on these things. I spent a half hour trying to track down a grounding issue until I realized the coating on the springs was interrupting the ground circuit.) I also planned to slap a FU brass block on the edge.
So I kind of planned on going all out on this one. It’s the only Japanese Ibanez I own to date.
Now it’s photo time!!! These are the original shots before work began on it.
Before Photos of the Ibanez RG530


Ibanez RG530 Roadstar II Project Phase 1
Today I started work on the 1986 MIJ Ibanez RG530 Roadstar II I recently bought. This post contains the details of the first phase of this project. This consisted mainly of fret work and a few other minor things. I was going to detail how to change out the stock block on the Edge tremolo for a Floyd Upgrades brass block, but I ran into a little issue there which I will detail below.
Preliminary Photos


Everything was in decent enough shape initially. It was missing the pads and screws on the locking nut but those were easily replaceable. The pickups will have to go as well since they are some of the muddiest and noisiest pickups I’ve ever heard, especially when split. I’ll get to that in a later phase though. I’m still waiting for my Bill Lawrence L500R/L500XL set to arrive. It’ll probably be a couple of weeks.
Tear Down
There wasn’t a great deal to take apart at this point. I started by removing the strings.


All I had to do is unwind them at the headstock and loosen the locking screws at the bridge. After removing the strings I made sure to re-tighten the locking screws at the bridge so I didn’t loose the string clamp blocks, which can easily fall out when turned upside down.

Next, I flipped the guitar over and removed the springs from the tremolo cavity.

After that the tremolo unit fell right out the front of the guitar.

The Floyd style tremolos simply sit with their knife edges against two mounting studs and depend on the tension from both the strings and the springs to hold them in place. This allows them to “float” on the two fulcrum points.
Leveling and Crowning the Frets
The first thing I did was make sure the rosewood fretboard was protected from the tools I would be using. To do this I simply used painter’s tape to mask off the fretboard.

I just used various sizes of tape I had on hand. I regret using the white tape though. This is standard masking tape and the adhesive on it is too aggressive. I ended up pulling a small piece of finish off the edge of the fretboard when I removed the tape. For that reason, I recommend sticking with a good blue painters tape.
Once I had the fretboard taped off I used my Fret Rocker from StewMac to check the frets for level.

Just about every other fret was slightly high. It was only by the slightest bit though for the most part. Since this guitar is 26 years old and has been heavily played, it didn’t have a great deal of fret wire left to work with. Normally, I would use a large radiused block with stick on abrasive to level the frets rapidly and then proceed to crowning them with a fret file. However, considering how little fret there was to work with and how little leveling needed to be done, I opted to do the crowning and leveling all at once with just the fret file. This is slower but more precise and has less risk of over-leveling what is left of the fret wire.

This file has a wide slot on one side and a medium slot on the other. I have another file with narrow and medium slots. For this job I used just the wide side. The fret wire on this guitar was probably what is called Jumbo fret wire, which Ibanez uses frequently.
It took a couple of hours to file these all down one by one, constantly checking for level after each fret was done. I often had to go back and tweak the previous fret since leveling the next one would effect the last one a little. I was finally satisfied with the level and crown on each fret and moved on to polishing,

I started the process by removing the majority of the file marks that were left behind with some 400 grit wet or dry automotive sand paper.

I then progressed though each grit of Micro Mesh pad from coarsest to finest until I had the fret wire looking shiny and almost new again.

It’s hard to tell in the photo but they now have a nice shine to them and are very smooth. Next, I removed the tape protecting the fretboard.

There are still one or two frets which rock the slightest bit, but I filed them as far as I felt comfortable with considering how little wire was left. This is probably the only time I’ll be able to do this. The next time it needs it, I’ll have to do a full re-fret.
To finish off the fretboard I oiled it with Dunlop 65 Lemon Oil.

This stuff comes with it’s own applicator tip. I just had to wipe it onto the fretboard and let it dwell a few minutes. Then I wiped away the excess that didn’t absorb.

The wood is now nice and healthy looking again. It’s worth noting that you should only use oils like this on certain types of fretboards like rosewood. Don’t use lemon oil on woods like Maple. They are often lacquered and the lemon oil could damage the finish. Even if the maple is left unfinished it does not take the oil well.
Installing the Brass Block…or not!
The next step was going to be installing my brass block upgrade. Before tearing the tremolo assembly down, I decided to compare the size of the new block vs the old one. I’m glad I did!

Oops!. It turned out that the new block was too short! I ordered the block from Floyd Upgrades that was listed as the correct fit for the Ibanez Edge tremolo. This block does fit the Ibanez Edge tremolo. However, most of those tremolos are installed in a recessed mount, meaning there is a recess cut into the top of the guitar and the tremolo actually sits down in it. This allows you to both dive and pull up on the tremolo. The Ibanez RG530 Roadstar II has the Edge installed as a dive only tremolo, meaning that the tremolo unit sits on top of the guitar instead of in a recess and can not be pulled back on. As a result, I needed a block that is taller than what the Edge would normally use in a recessed mount.
I called Floyd Upgrades and inquired about what could be done. As it turns out, he had custom cut a deeper block for a customer last week and happened to make a spare when he did it. So he had the block I needed already in stock. All I have to do is send back the short one and he’ll ship the replacement out the same day. That’s good service!
So take note of the following. If you have a recessed Edge you need the standard Edge block, which I believe is 32mm. If you have a non-recessed Edge you need to request a custom 40mm block.
Since that development put the brakes on the project, I finished up with the only thing I could still do.
Installing Dunlop Straplocks…and other parts.
The existing strap buttons where coming loose from the guitar. The wood around them had worn out.

To remedy this, I cut a small oak plug and hammered it into the hole after applying a coat of wood glue to it.

That gave me a nice hard plug to screw my new buttons into.

This is a set of Dunlop Straplocks. I’ve already got plenty of straps with the locking mechanism on them so I’m just installing the buttons on the guitar at this point. They install just like any other button. I added the felt pad to protect the guitar finish and screwed them in.

The only other thing I could do at this point is check the fit of the replacement pads and screws on the locking nut.

These are the Schaller pads and screws from StewMac. They are meant for a Floyd Rose tremolo but they fit the Edge nut just fine.
To be continued…
That’s it for now. I’m at a standstill until I receive the replacement brass block. Hopefully I’ll have that by the end of the week and I’ll follow up with a post on how it is installed. I’ll then be stringing the guitar with 11-49s and tuning it up to D standard. Once my Bill Lawrence pickups arrive I’ll cover shielding the cavities and installing the pickups.
Ibanez RG530 Roadstar II Rebuild Project Phase 2
I finally got the brass block replacement in for the RG530 Roadstar II. I also received confirmation that my Bill Lawrence pickups had shipped so I decided to wait until they got here before continuing the project. The pedal board build was keeping me tied up anyway.
Well, everything is here now so let’s take a look at how things went.
The Electronics
Here I removed the old Ibanez pickups. I decided to leave the pickup cavities unshielded since the pickups going in had their own metal shield surrounding the coils.

I disconnected the pickups from the volume pots and ground circuit and then removed all the wiring from the cavity. I went ahead and left the output jack in place with the leads still attached.

I went ahead and shielded the control cavity with copper foil, soldering the seams to give the best coverage.


This is one of the new pickups I installed. I put a Bill Lawrence (Wilde Pickups) L500XL in the bridge and a L500R in the neck.

Here they are fully installed. I had to plug the old screw holes and tap new ones. The mounting rings that came with the pickups were just the slightest bit smaller than the old rings.

Here are the old electronics reconnected to the new pickups. Each pickups has it’s own push/push volume pot that splits the coils as well. I pulled the capacitor from the master tone control and added a Bill Lawrence Q Filter instead. More on that later.

The Edge Tremolo
With the electronics out of the way, I began disassembling the Edge tremolo found on the Ibanez RG530.

Before removing anything I used my pin gauge to record the current saddle positions.

This would help set intonation later.

I unscrewed the string clamp bolts and removed them from the tremolo.

Then I loosened the screws holding the saddles down and removed all the saddles.

Next, I unscrewed the three large screws holding the block to the base plate. The tension plate was also clamped between the block and the base plate so it came off as well.

Next I installed the Floyd Upgrades brass block (custom 40mm height) using their stainless steel hex bolts.

I then reassembled the entire tremolo and reinstalled it into the guitar.


Next I restrung the guitar using Everly B-52s in 11-48 gauge. I’ve never used these before so we’ll see how they sound. They are color coded just like D’Addarios.

Next I moved on to setting up the guitar. I first adjusted the posts to get my action where I wanted it. I then checked the truss rod, but it was fine as it was. I moved up two gauges in string tension but I tuned the guitar to D standard so the neck did not need a tweak.
After the basics were done I moved on to setting the intonation.

This is where the open note read after tuning the guitar. It’s almost dead on the note (G in this case.)

When fretting the string at the 24th fret it should read the same as the open note if the intonation is correct. This one is reading over 20 cents sharp. This means that the string is too short. I needed to move the saddle back to lengthen the string.

My camera seems to like my leg too well to get a clear shot here, but this is the intonation tool Floyd Upgrades sells. It is designed for an actual Floyd Rose, but I found that it worked just fine on the Edge.
To use it, I hooked the tip against the base plate and the claw around the head of the string lock bolt. I then loosened the screw holding the saddle down.

I then detuned the string about 6 turns and started turning the thumb screw on the intonation tool. I had to push the saddle back with one hand while turning the tool to gradually draw the saddle back. Once I had it moved about 2mm, I locked the saddle back down. I removed the intonation tool and retuned the guitar. I checked the intonation again and it was better but still slightly sharp. I repeated the process all over again until the string fretted at the 24th fret read the same as it did when played open. Once I got it right, I repeated the process for all 6 strings. They where all a little sharp.
Please note that there are various ways to set the intonation. Some people check the 12th fret harmonic against the open note. Some check multiple frets up and down the board. I use the 24th fret because I find that the shortest string length gives the most accurate results. For example, if I set intonation using the 12th fret harmonic, then the guitar tends to sound correct for the lower half of the fretboard, but the upper registers still sound out. Setting it at the 24th fret results in the entire length of the fretboard being pretty well intonated afterward.
Finished Shots of the Ibanez RG530
Here is the Ibanez RG530 Roadstar II all put back together.


I’m pretty happy with it at this point. There are a few issues though.
For one, the frets are very worn. I got them leveled fairly well but there is still some minor fret buzz. It’s nothing that really effects playing, but I won’t get another dressing out of these frets. They’ll have to be replaced the next time they need work.
The electronics probably should have been replaced. They didn’t have any crackle in them but there is still an annoying buzz that persists. The shielding is pretty complete and the pickups are new and well shielded. I’m left thinking the old electronics are to blame.
The pickups themselves sound decent. They are excellent distorted for rhythm sections. They are a bit too piercing for lead work though, and not and clear as I was expecting on clean sections. I’m still messing with the amp EQ trying to sort it out. I don’t really dig the way the Q Filter works by itself though. I think changing the tone pot to a 250k dual concentric pot and adding a tone cap to one of those pots and the Q Filter to the other is an experiment I’m going to try. I’ll have the output taming of the Q filter and my old familiar tone control back.
That’s it for now. I’ll post an update when I get the tone issue worked out.
Thanks for reading.
Products Used in the Ibanez RG530 Project
Ibanez Edge Brass Block: https://www.fu-tone.com/product/brass-sustain-block-for-ibanez-edge/
Silent Heavy Spring Upgrade: https://www.fu-tone.com/product/fu-tone-noiseless-springs-for-guitar-tremolos-3/
Wilde Pickups: https://www.wildepickups.com/products/l500
Micro-mesh Pads: https://amzn.to/3UfMMiz
Fret Crowning File: https://amzn.to/3FOUjAE
Fret Rocker: https://amzn.to/3NGvQPD
Dunlop Lemon Oil: https://amzn.to/3NGwf4B
Dunlop Strap Locks: https://amzn.to/3UvQxA2
Contour Gauge: https://amzn.to/3UdUoCm
Guitar Tuner: https://amzn.to/3FJVLnP
DeoxIT D5: https://amzn.to/3G69UMr
Tri-Flow Superior Dry Lubricant: https://amzn.to/3DGlVVN
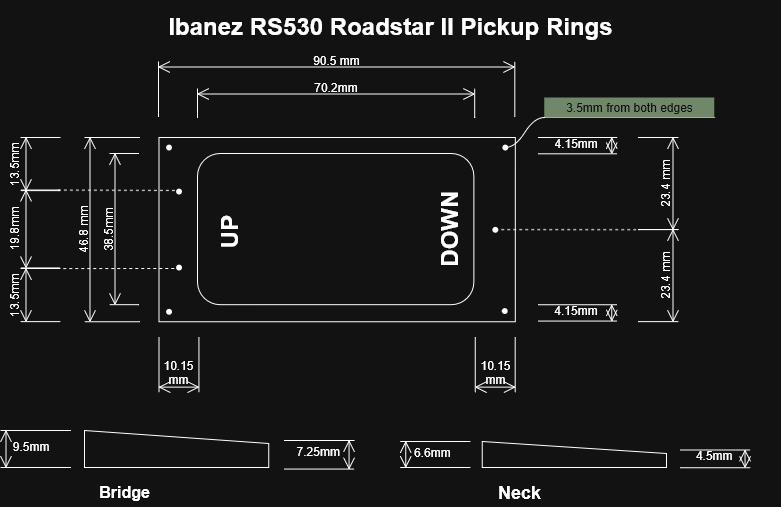
Other Files
I’ve had a few request for information on this project recently. One of the more sought after pieces of information is the size specs for the original pickup rings for those looking to do a restoration. These rings are a bit oddly sized compared to a modern humbucker ring and use a three screw balancing system instead of the typical two screw. I tracked down an original set of rings and took my own measurements off of them in case anyone want to have a custom 3D print done. Keep in mind that in the era these were made, tolerances were terrible so the measurement varied greatly from one end of the piece to the other. Ideally, I recommend double checking the inside opening and leveling screw measurements against your actual set of pickup.